


Using the Osteological Database
The following help page provides an overview on how to access and manipulate the download files available through the Wellcome Osteological Research Database.
This page will cover the entire process, from downloading the files themselves, to getting the data they contain into state in which analysis and manipulation can occur. Of course, for ease of use only the most direct advice can be offered to facilitate the successful download and assimilation of the data files - for more detailed information users are pointed to the help files and manuals of specific applications.
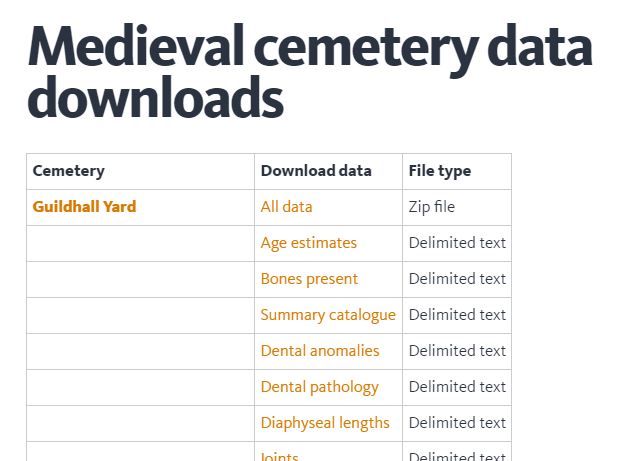
To view available data downloads, navigate to the Wellcome Osteological Research Database, and select the heading for the period you wish to view. Data downloads, if available, are the first option below each period heading. The download tables indicate the cemetery, type of data and download file type, as this example shows:
To download a file
If you are using a Windows PC right click on the link and select:
'Save target as' - Internet explorer, Netscape, Opera
'Save link as' - Mozilla Firefox
If you are using a Mac:
With mouse over the link use the “command” or “apple key” and “s” to save the page/link - Internet Explorer, Mozilla Firefox and Safari.
Opening the downloaded file
You have downloaded one or more delimited files, (if you downloaded the zip file see the panel on the right of this page), and the following instruction show you how to open them, one-at-a-time in Excel. The download files have a .LST extension and contain values separated with the pipe '|' character.
1. Open Excel
2. Click on the File > Open menu item
3. Locate and open your downloaded file.
4. This will open the Text Import Wizard. Here you need to click on the Delimited radio button and then press the Next button.
5. In the next window you need to ensure that the Other tick box is ticked and in the field to the right of it that the pipe character, is inserted. (Fig.4)
The pipe character consist of a single vertical line with a break in the middle and is normally found on the bottom left or right of your keyboard (Fig. 5). You may then click the Finish button and the file should load into Excel.
6. Your data will now be in Excel, but in order to make it more legible you can set each column to the a width large enough to accommodate the longest element in each field. To do this highlight all cells by clicking on the extreme top left of the worksheet, which will cause the entire workbook to be selected (see Fig. 6). Then simple click on the Format > Column > Auto-fit selection menu item.